Fashion
How to Compare Flat Clothing Measurements Before You Buy
The number is useful only when you know how it was taken.
Compare a secondhand listing with a similar garment that already fits you. Lay your item flat, measure the same points without stretching it and check that both numbers use the same units and method. Ask the seller about an unclear measurement before deciding.
Find a fair comparison
A favorite shirt is a useful reference for another shirt with a similar cut and fabric. It is less useful for predicting how a fitted, nonstretch dress will feel. Start with a piece you wear comfortably and decide whether you want the new item to fit in the same way, more loosely or more closely.
Check the listing for the actual measurement names. “Chest,” “pit to pit” and “bust” may describe different things. A body measurement goes around a person; a flat width goes across one layer of a garment laid down. The number alone does not tell you which method a seller used.
Prepare your reference garment
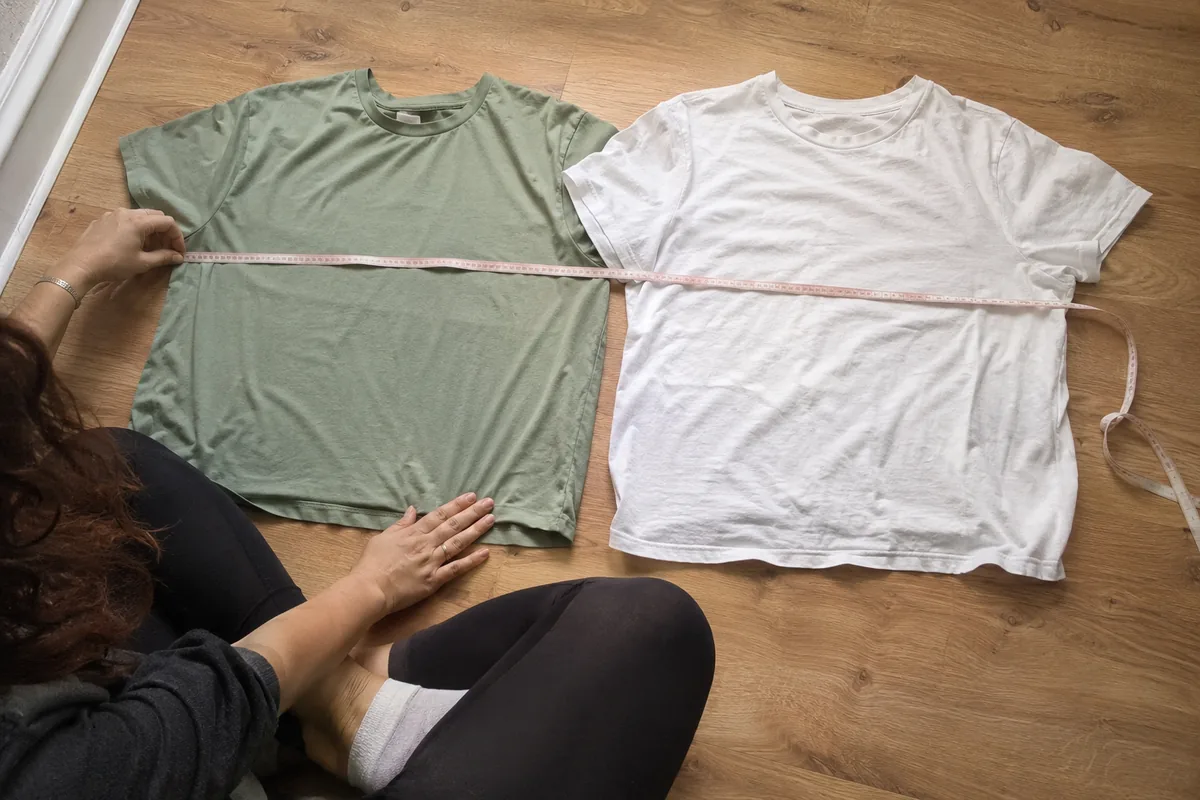
Fasten buttons and zippers as you would when wearing it. Empty the pockets and lay the piece on a flat surface. Smooth folds gently without stretching the fabric or pulling the seams out of place. A flexible tape and a note with the units are enough.
For a top, measure across the chest from one underarm seam to the other. For a waistband, align the front and back edges and measure straight across. For trousers, the inseam follows the inner leg seam from the crotch to the hem. For length, first determine whether the listing starts at the highest shoulder point, the center back or somewhere else.
These are examples rather than rules every seller follows. Viktr Martin's garment-measurement guide labels the flat widths it requests and tells readers not to double those widths when entering them. Match the seller's instructions, not an assumption about a marketplace.
Compare the same route and the same units
Write the two values side by side and label each one. “Reference shirt: underarm to underarm, laid flat” is more informative than “my size.” If one seller gives inches and another gives centimeters, convert using the exact unit relationship before comparing; do not mentally round a narrow difference into a guarantee.
Some listings report a flat width; others report an estimated full circumference or a body-size chart. Ask which one applies. Doubling a flat width can be an estimate for some simple shapes, but seams, stretch, garment construction and the way a piece lies can affect the comparison. A calculated circumference is not a promise of fit.
Look at more than one point. A jacket can have a generous chest width but a narrow shoulder or sleeve. A pair of trousers may match the waistband yet differ through the rise or seat. Decide which differences matter for how you intend to move and which you are willing to discuss with a tailor.
Ask a useful seller question
When a listing is unclear, ask for a specific measurement and its route: “Could you measure across the fastened waistband while the trousers are laid flat, without stretching, and tell me the units?” A picture showing the tape and endpoints may help both of you understand the answer.
If the seller cannot measure or the garment has an unusual construction, decide whether the remaining uncertainty is acceptable before paying. Check the return terms and total cost, including any shipping or repair you expect. A measurement improves a decision; it cannot reveal every hidden stain, odor or worn seam.
Check condition separately from fit
A piece can match your reference measurements and still need work. Ask about closures, seams, fabric content, visible marks and any areas the photos do not show. Our thrift inspection guide walks through those checks. If the listing is final sale or the return terms are unclear, resolve that question before assuming you can send it back.
Use the purchase-pause guide if a countdown or discount is rushing the decision. A well-labeled measurement note gives you something concrete to review during that pause. The size and fashion guide also explains why a label alone is not an objective verdict on your body.
Listing comparison checklist
Check each detail you have confirmed. These ticks stay on this page.
Give the lower hem its own measurement route
Name the lower opening before comparing two shirt widths. A straight route between the side-seam/hem junctions and a tape following the curved edge describe different records. The labels bottom width and hem length can appear beside either kind of image, so the label alone does not settle the method.
| Record received | Clarification to request |
|---|---|
| Straight bottom width | Exact endpoints and fastening condition |
| Tape following a rounded edge | Whether an edge length was supplied instead |
| Side-split or uneven hem | Which corners or seam junctions were used |
VIKTR MARTIN's shirt guide identifies the side-seam/hem junctions for its curved-hem method. Preserve that attribution rather than extending it to every unusual shirt. Ask the seller to name a different convention when needed.
The five shirt hem-width checks show the routes with original sketches. Keep each value with its own unit, relaxed or stretched condition and preparation note. A comparison becomes clearer when the methods match; adding a calculation does not repair a missing endpoint. Retain the original listing value while you request a better-labelled record.
Are the two shirt lengths describing the same face?
Pause a length comparison when one record starts beside the front neckline and the other starts at the center back. Both can be valid garment measurements while answering different questions. The starting point and lower endpoint belong in the record before you interpret the difference.
| Two values supplied | Information still needed |
|---|---|
| HPS front length and CB back length | A matching route on both shirts |
| Neck-seam length and collar-top length | Whether the collar is included in each value |
| Front length and an unspecified total length | The garment face and exact lower point |
Our shirt-length starting-point guide separates these methods with original sketches. Use a two-record note: retain the listing's wording on one line and your reference garment's method on another. Mark the unmatched field instead of silently renaming both numbers “length.”
Ask the seller to confirm the start, hem point, relaxed preparation and unit. A tape photograph can show a hidden collar or a back hem that extends below the front. Converting units remains useful once the methods align; it cannot supply those missing landmarks. Keep the other dimensions and the garment's condition as separate parts of the buying decision.
Questions to keep beside your notes
- Is the reference garment similar in cut and fabric?
- Are the two measurements both flat widths, both circumferences or different kinds of number?
- Do the start and end points match?
- Are the units clear?
- Have you checked condition, total cost and return terms?
If one answer is missing, write the question down rather than filling in the gap yourself. A seller's method and the garment's construction matter more than a universal threshold copied from another listing.
Compare sleeve length by construction
A sleeve measured from a shoulder seam to a cuff is not directly comparable with a collar-to-cuff raglan measurement. Note the construction, starting point and cuff position before treating a difference as a fit signal. A dropped shoulder can place the seam lower on the arm even when the cuff ends in a similar place.
Use the flat sleeve measurement guide to record the seller’s route and ask for an endpoint photo when it is unclear. Keep the garment measurement separate from a body sleeve measurement.
Does the tape follow the same curve?
Match the route as well as the endpoints before comparing two garment lengths. A tape following a curved seam and a tape pulled across a straighter path can describe different measurements even when both notes say “rise.” Check whether the waistband is included too; a number that stops at its attachment seam is not the same record as one ending at its top edge.
| Mismatch | Next step |
|---|---|
| Curve versus straightened route | Ask which method produced the listing number |
| Different waist endpoints | Remeasure both with matching endpoints |
| Tension not stated | Ask how the fabric was held; do not assume |
The pants-rise measurement guide separates front and back readings and provides a method card. Ask the seller, “Does your rise include the waistband, and did you follow the curve or straighten the seam?” Keep the answer with the listing. Matching units alone cannot resolve a route mismatch.
Decide what the difference is comparing
Before interpreting a generous number as extra room, label both sides of the comparison. A flat garment width and a body circumference are different measures. Even matching units do not make them interchangeable. A finished-garment chart may describe an intentionally loose silhouette, while the seller's body-size chart describes the wearer the size is intended for.
| Pair of records | Useful next question |
|---|---|
| Garment width and body circumference | Can both be recorded using corresponding methods? |
| Two similar garment widths | Were the endpoints, closures and tension matched? |
| A body-size chart only | Are finished dimensions or fit notes available? |
The wearing ease and design ease guide explains the two purposes of the room in a garment. Keep the intended cut alongside the measurement note. A difference can prompt another question without proving that a listing is the wrong size. If the method is still unknown, ask the seller rather than filling in the missing detail.
Label shoulder width without doubling it
A shoulder-to-shoulder garment width is not the same kind of record as a flat chest width used to estimate circumference. Write the named seam points beside it. A number described only as “shoulders” may still leave the side of the garment, tape route and construction unclear.
| Information in the listing | Useful follow-up |
|---|---|
| Two set-in shoulder seam points shown | Confirm the straight or curved route and units |
| A dropped-shoulder outline | Compare the intended construction, not just the seam position |
| Raglan or unclear seams | Ask which measurement route the seller actually supplies |
The five shoulder-width checks give this record its own method. Keep it beside the chest and sleeve notes, and compare a reasonably similar reference garment. Converting units resolves a unit difference; it does not turn a collar-to-cuff measurement into a shoulder width. If the seller’s point is still unidentified, retain the question instead of deriving a fit prediction from an unexplained number.
Keep three cuff dimensions in separate fields
A sleeve opening can match in one dimension while differing in another. Separate the closed flat opening, the opened band and the cuff height before using a listing to compare clothes. These records describe different routes, even when a seller calls each one “cuff.”
| Record supplied | What to confirm |
|---|---|
| Closed flat opening | Finished edge, fastening position and relaxed condition |
| Open band | Exact button and buttonhole endpoints or an edge-to-edge route |
| Cuff height | Finished edge to the joining seam, with any fold described |
The five checks for a flat cuff measurement show how to name the record. Include the left or right sleeve and the unit beside the number. Do not compare a body wrist measurement directly with the opening across a garment. Nor does multiplying an unexplained width fix a missing method. When two records disagree, ask whether their routes and fastening positions match before interpreting the difference. Keep the seller’s original value visible, including any precision or rounding they specify.
Record seam alignment beside the numbers
Before comparing two shirts, photograph each one resting without stretching. Identify the same side seam and record whether it curves toward the front or back. A chest-width match does not establish a matching outline: the measurement and seam alignment answer different questions. Keep the fastening state, unit and route consistent if you also record dimensions. Do not pull a twisted shirt into a rectangle solely to make a tape measurement easier; note any preparation that was necessary. If the listing supplies only numbers, ask for a relaxed full-front and full-back image.
The T-shirt seam-twist record separates alignment, care history and dimensions, with a comparison table for keeping those observations apart.