Fashion
How to Measure Sleeve Length on a Garment Laid Flat
The start point matters as much as the number.
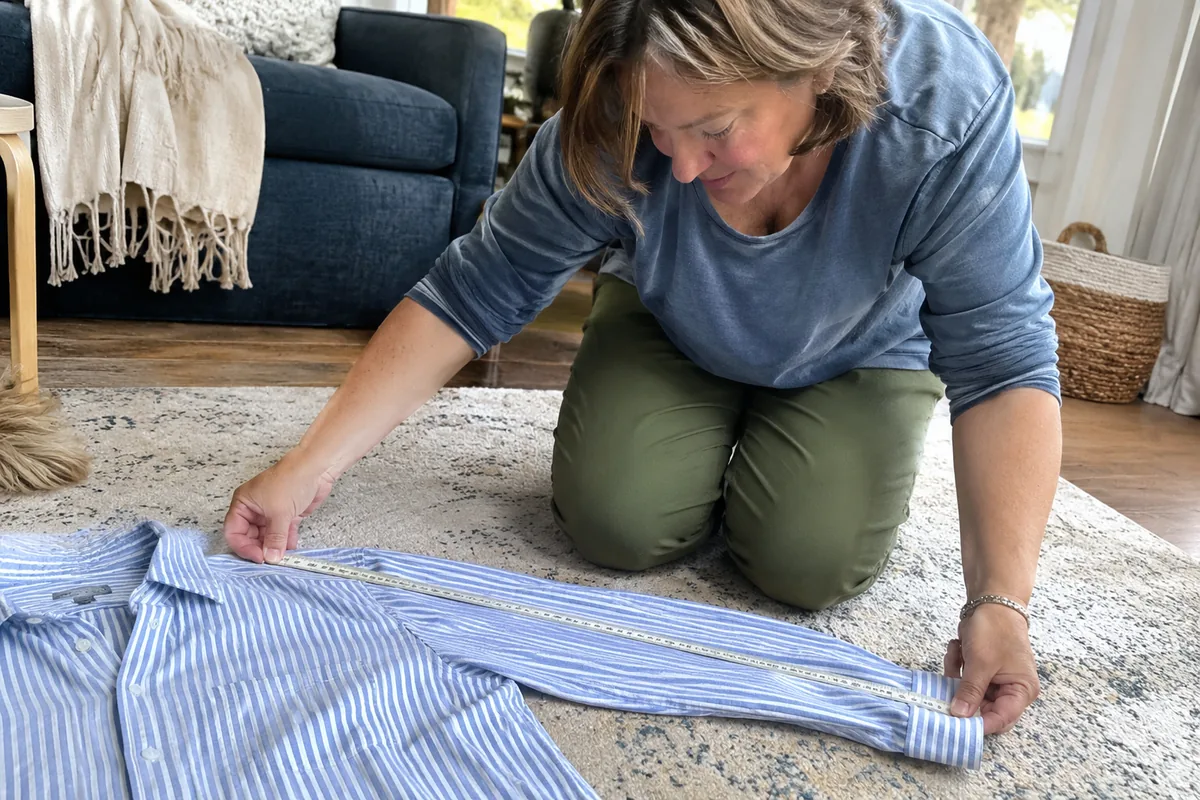
Lay the garment flat without stretching it and measure from the seller’s stated starting point to the finished cuff. For a set-in sleeve, that may be the shoulder seam; for a raglan, ask whether the measurement begins at the collar. Record the route and units before comparing listings.
When a flat measurement becomes a sewing alteration, keep the finished line separate from the cut line. The seam allowance calculator: cut and finished sizes shows its method and lets you keep the calculation.
Start with the sleeve you are comparing
A sleeve measurement is useful when the two numbers describe the same route. Before reaching for a tape, identify the garment type and the point where the seller starts. A fitted blouse with a shoulder seam and a loose raglan sweater do not necessarily provide comparable seam-to-cuff lengths.
Pick a similar garment that already feels comfortable over the layer you expect to wear. A heavy coat may need more room and behave differently from a thin shirt. Note whether you want the sleeve to end at the wrist, cover part of the hand or leave room for a turn-up; those are preferences, not universal rules.
How do you measure a set-in sleeve?
Use a flexible tape on a level surface. Close the garment as you would wear it and smooth it gently, without stretching the sleeve or pulling the cuff out of shape.
- Find the point where the shoulder seam meets the sleeve seam. Check that the listing uses that same starting point.
- Arrange the sleeve so the edge or seam specified by the seller is accessible. Keep the garment relaxed rather than tugging the fabric straight.
- Run the tape along that route to the finished end of the cuff. If the cuff is folded, record whether it was folded or unfolded.
- Write down the measurement, the unit and the two endpoints. Repeat to check that you followed the same line.
For example, a note could say “flat jacket, shoulder seam to unfolded cuff along outer sleeve, 24 inches.” That is a fictional record, not a recommended length. The retailer Standard & Strange describes its own shoulder-seam-to-cuff method; another seller may use a different path.
Which starting point goes with which sleeve?
- Set-in sleeve: ask whether the tape starts at the shoulder seam and which edge it follows.
- Dropped shoulder: note where the lower shoulder seam sits when worn.
- Raglan: ask whether the measurement starts at the collar or another named point.
- Turned cuff: confirm whether the cuff is folded or unfolded.
These are examples of ways to label a measurement, not a standard followed by every listing. A dropped shoulder places the garment seam lower on the arm than a conventional set-in seam. Its seam-to-cuff number can therefore be shorter even when the sleeve reaches a similar place on the wearer.
How do you compare a raglan sleeve?
A raglan seam runs from the neckline area toward the underarm, so there may be no shoulder-seam point in the place you expect. Ask where the seller begins and where the tape travels. Some retailers measure from the collar along the upper sleeve to the cuff; others may name a different route.
If your reference sweater and the listed garment both have raglan sleeves, copy the seller’s starting point and path on your own piece. If one has a set-in sleeve and the other is raglan, a single seam-to-cuff number cannot settle the comparison. Ask for additional photos or other relevant dimensions, and decide whether the remaining uncertainty is acceptable.
Is this the same as your body sleeve measurement?
No. A flat garment reading describes the garment along a stated route. A body measurement may start at the center back of the neck, travel across the shoulder and continue down the arm. The garment needs room for movement and may be designed to fit loosely or closely.
Do not add a fixed allowance to a body number and present it as a guaranteed garment length. The designer’s cut, shoulder placement, fabric and how you plan to wear the piece matter. Our flat clothing comparison guide explains how to keep garment width and body circumference separate too.
What should you ask an online seller?
Ask one specific question: “Could you measure the sleeve laid flat from the point you use to the end of the cuff, tell me the units, and show the start and end in a photo?” If the cuff can be turned back, ask whether the listed reading includes that fold. A photo can clarify the route, but it is not a substitute for the number and unit.
Check the item’s condition and return terms separately. A sleeve that matches your reference could still have a stretched cuff, worn elbow or a repair that changes its shape. The thrift inspection guide offers a separate condition check, and the guide to fashion and size explains why a label should not make the decision for you.
Listing comparison checklist
Check each detail you have confirmed. These ticks stay on this page.
Five things to record before deciding
- The garment and the layer you intend to wear underneath.
- The sleeve construction: set-in, dropped shoulder or raglan.
- The tape’s start, path and finished endpoint.
- The unit and whether a cuff was folded.
- The condition and return terms, kept separate from the measurement.
If an answer is missing, write the question down rather than inventing a value. A repeatable note makes the comparison easier to discuss; it cannot guarantee the fit of an untried garment.
Keep the shoulder record beside the sleeve record
The sleeve seam can start in a different place on two jackets even when you prefer a similar cuff position. Record the construction alongside the sleeve route before deciding what a difference means. A shorter seam-to-cuff reading on a dropped-shoulder piece is not, by itself, proof that the worn sleeve will end higher.
| Comparison | What needs to stay explicit |
|---|---|
| Set-in to set-in | The shoulder junction and route to the finished cuff |
| Set-in to dropped shoulder | Different seam placement and the intended outline |
| Set-in to raglan | A different supplied starting point, often requiring a separately named record |
Use the jacket shoulder-width guide to identify the seam junctions when they exist. Do not add unrelated widths and lengths to manufacture a matching measurement: those routes may not join into the same path. Ask for a comparable route or an endpoint photograph when needed, and keep cuff preference and actual movement as separate parts of the eventual try-on.
Separate the sleeve endpoint from its opening
Sleeve length ends at a named finished edge; cuff width runs across that edge. Matching one does not establish the other. A deep or turned-back cuff can also change the description of the endpoint without providing a comparable opening measurement.
| Detail | Note it before comparing |
|---|---|
| Finished sleeve edge | Whether a turn-back is in its wearing position |
| Separate cuff band | Its height and how it joins the sleeve |
| Opening across the end | The fastening state and whether it is relaxed |
Use the cuff-width method guide for the last record, and retain your original shoulder-to-cuff route for length. If one seller measures an unfolded sleeve and another measures it turned back, request matching states rather than subtracting an assumed fold depth. A photograph with the beginning and end of the tape can resolve the ambiguity. After the routes match, consider the rest of the sleeve and the intended layer; one matching endpoint does not promise comfortable movement through the whole arm.
Does CB name a body length or a sleeve route?
Read the destination as well as the starting abbreviation. Center back can appear in a shirt's body-length field and in its sleeve-length field. A tape going down the back toward the hem describes a different route from one crossing the shoulder and continuing to the cuff.
| Label and route | Keep this endpoint explicit |
|---|---|
| CB body length, down the back | The named lower back edge |
| CB sleeve length, across the shoulder | The finished sleeve or cuff edge |
| HPS front body length | The specified front hem point |
SanMar's measuring sheet illustrates these separate records. Its neck-to-hem body reading does not become a sleeve reading merely because both use a back-neck landmark.
If a resale listing supplies a number labeled only “CB,” ask which destination and path it describes. Keep your own shoulder-to-cuff record unchanged while waiting for the answer. The HPS versus center-back body-length guide covers the vertical route separately. Do not combine a body length with a sleeve segment to invent a comparable number: the tape paths have not been shown to join into the requested measurement.
Release adjustable parts before repeating the route
When repeating a sleeve-length measurement, record adjustable features that could change the endpoint: a rolled cuff, a cinched elastic opening or a tab securing a fold. Compare the same state rather than attributing every difference to sewing or shrinkage. Keep a photograph of the start and end points with the original reading. Our elastic measurement guide explains why an unlabeled tension state is an unresolved method question, not a value to guess. For a fictional shirt comparison, one sleeve measured to a folded edge and another measured to the unfolded cuff are not matched lengths. Ask which endpoint the seller used. Restore only ordinary adjustable features; do not unpick seams or force a fragile cuff to reproduce an assumed measurement.
| Before comparing | Keep in the note |
|---|---|
| Route | Named start and end points |
| State | Relaxed, extended or adjusted as observed |